KWSViewer - Interactive viewer for Keyword spotting output
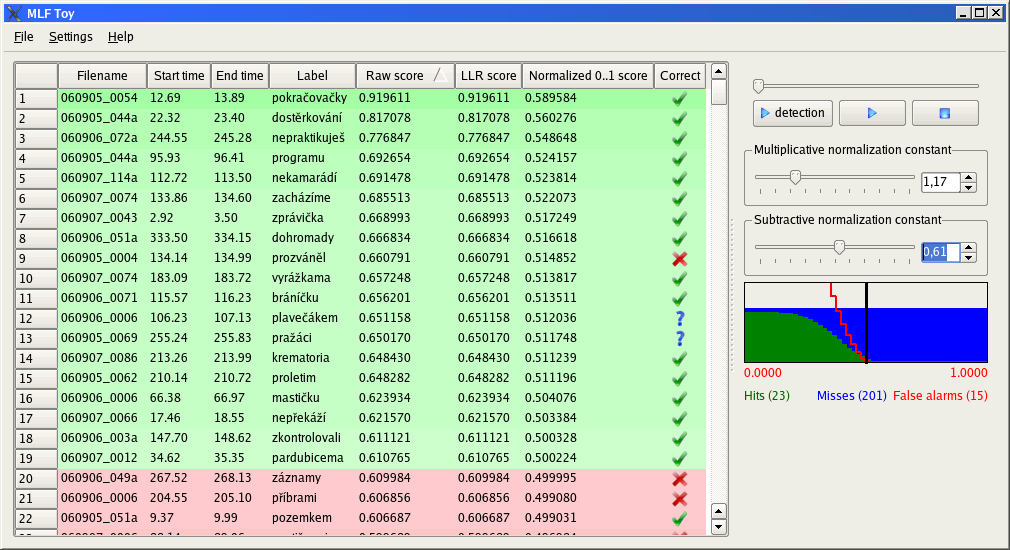
This tool can load an output of a keyword-spotting system (KWS) and reference file in HTK-MLF format and show detections in a tabular view. You can also use it to replay detections, tune and visualize scores, hits, misses and false-alarms using sliders on the right-side panel.
Installation - Windows
Download here kwsviewer_v1.5_win32.zip (6MB). No installation is needed. You can run kwsviewer.exe directly without any installation.
Installation - Linux
Download here kwsviewer_v1.5_src.zip (300kB). Requirements:
- Qt version 4 (4.5 is recommanded) - http://www.qtsoftware.com/downloads/linux-x11-cpp
- FMOD Ex Programmers API - http://www.fmod.org/index.php/download#FMODExProgrammersAPI
Unpack the kwsviewer's source archive, edit paths in kwsviewer.pro, run "make" and you should have the executable ./kwsviewer ready.
Usage
First you have to open an MLF (output of the keyword-spotting system). In the main menu go to "File" -> "Open" and select the MLF with detected keywords. You can also set a reference MLF to see hits, misses and false alarms. If you would like to listen to the detections, set also the "Audio folder". After the MLF is loaded, you can:
- listen to the detections using the [4]media player,
- sort detections by any column by clicking on the column's header cell. Stable sorting method is used, so you can for example sort the detections first by score and then by label to have the detections grouped by label and sorted by score.
- tune scores using the sliders on the right-side panel. The modified scores can be saved to MLF by clicking on "File" -> "Save MLF".
- create reference file. By double-clicking on any detection in the "Correct" column you can set [yes.png] , [no.png] or [undefined.png] . So you can listen to detections and set their correctness and then save the reference file by clicking on "File" -> "Save reference MLF".
Colors
Each detection in the table view has a green or red background color depending on it's [5]Normalized 0..1 score. The closer the score is to 1, the greener is the color and the further it is to 0, the redder is the color. The threshold between green and red is set to 0.5.
Filter dialog
To open the filter dialog, go to "Settings" -> "Keywords filter" or press "Ctrl+f". Here you can select the keywords which you want to see in the table view.
- > - move the selected keyword from "hidden keywords" list to the "selected keywords" list.
- >> - move all keywords from "hidden keywords" list to the "selected keywords" list.
- < - move the selected keyword from "selected keywords" list to the "hidden keywords" list.
- << - move all keywords from "selected keywords" list to the "hidden keywords" list.
You can also double-click on any item in any of the two lists to move it to the other list.
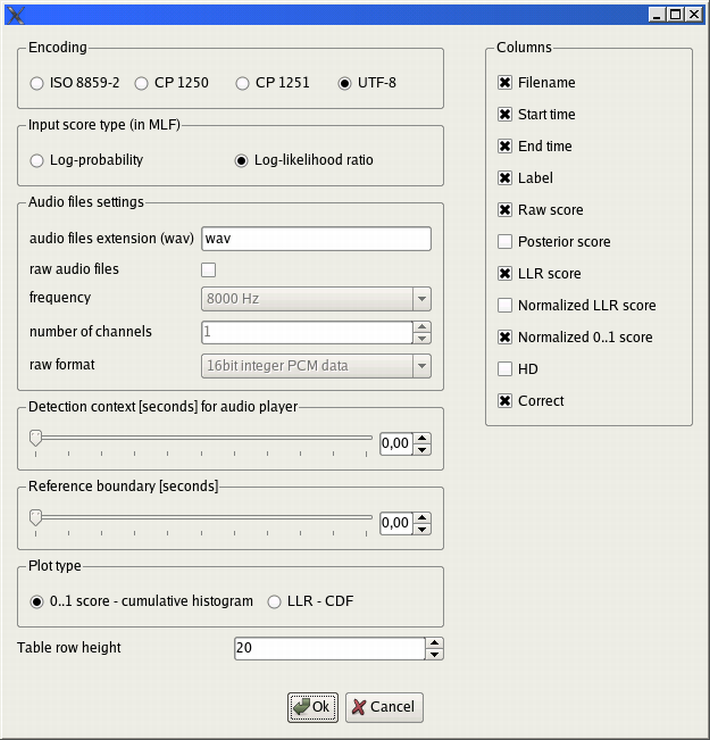
Preferences dialog
To open the preferences dialog, go to "Settings" -> "Preferences" or press "Ctrl+p". You can set there:
- encoding of the input MLF (ISO8859-2, CP1250, CP1251, UTF8)
- score type of the input MLF (log-probability, log-likelihood-ratio)
- audio files settings (extension, raw audio parameters)
- detection context for audio player (the time in seconds which will be added before and after a detection)
- reference boundary (for determining hits, misses and false-alarms from the reference MLF)
- plot type (0..1 cumulative, llr-cdf)
- table row height (try setting 5 and sort the detections by score to have a better overall view)
- visible columns (you can check/uncheck any column)
Media Player
Each detection belongs to some file (the "Filename" column). If the audio directory was set, then the filename with the extension specified in the "Preferences" dialog is searched in the audio directory. If it is not found there, media player will take the detection's file with it's full path and replace it's extension (after the last dot) with the specified audio file extension. If you double-click on any detection, the part of the audio file given by the detection's start and end time will be replayed. You can expand the time boundaries in the Preferences dialog -> "Detection context for audio player". You can also use the media player controls on the right-side panel:
- [play.png] detection - play only the detection
- [play.png] - play the whole audio file
- [pause.png] - pause
- [stop.png] - stop
You can also use the slider to seek to any position in the audio file.
Columns
- Filename
- Start time - in seconds
- End time - in seconds
- Label
- Raw score - as in the third column in the input MLF
- Posterior score = exp(log_probability) or sigm(log_likelihood_ratio);
- LLR score = logit(posterior_score)
- Normalized LLR score = (log_likelihood_ratio - additive_constant)
- multiplicative_constant ...additive and multiplicative constant is set on the right-side panelof the application.
- Normalized 0..1 score = sigm(normalized_llr_score)
- HD = 1 if the normalized_0_1_score is above 0.5
- Correct - if reference MLF was loaded, [yes.png] means correct and [no.png] means incorrect. Otherwise, the correctness is undefined - [undefined.png] .
The input HTK-MLF format
#!MLF!#
"P:/TEST_KWS/060905_0001_00004.rec"
29600000 39200000 complicated 0.0000000000 0.9998064924 1
.
"P:/TEST_KWS/060905_0001_00010.rec"
3100000 9700000 usability -0.0000000000 0.9998064924 1
27800000 33500000 train -3.8202736792 0.4460323491 1
36700000 41700000 file -0.0060353995 0.9320198154 1
.
Where the meaning of columns is:
1st - start time of the detection in hundreds of nanoseconds (time_in_seconds * 10000000)
2nd - end time of the detection in the same time units
3rd - label of the detection
4th - score of the detection (either log-probability or log-likelihood-ratio)
5th - normalized score of the detection
6th - hard decision
Only the first four columns are required as the output of keyword spotter, the others are optional. For the reference file, only first three columns are needed.